I love to-do lists. The satisfaction of crossing things off gives me a wonderful sense of achievement – whether it’s for personal reasons, or business. Having an effective to-do list system is really important for any busy business owner. Without a good, clear, easy to implement list system, it’s all too easy to forget the important stuff, miss an appointment or a reply to an email, leading us to feel stressed and out of control.
It’s taken me a good few attempts to get one that works. I’ve tried all sorts of applications, from apps like ‘Todoist’, ‘Remember the Milk’ and ‘OneNote’, and computer tools like Highrise, calendar and Basecamp to paper and pen with bullet journaling, and diaries. But the one I’m going to share with you is by far the most efficient and successful to date.
A to-do list system should be:
- Easy to implement
- Easy to read and understand
- Simple and efficient
- Not expensive
The secret to any good list system is using one that works for you – one that you will continue using, no matter where you are, or what project you’re working on.
Firstly, I’m a very visual person and I like pen and paper. (I’ve tried to go paper free, but it’s just not for me.) With this system, it allows you to see an entire snapshot of your items, and adding the use of highlighters makes it easy and quick to see what needs to be done. I’ve found that a spiral-bound notebook, rather than loose leaf sheets of paper keeps everything in one place. (I’ve used loose sheets of paper, which I’ve then filed, but trying to find notes or extra info was a real faff, and then my notes went out of order, with no easy reference) This type of pad also keeps the pages nice and flat. The pages are lined with holes already punched – so that I can file anything if necessary. (As an aside, I also use a lever arch file for all my client work, using tabbed dividers. I’ve tried box files, hanging files, and a host of other ways, including on my computer, but I’ve struggled with a paperless option, so I go with what works for me.) Also, an A4 notebook doesn’t require charging, it’s easily transportable and doesn’t need any expensive subscriptions – something to bear in mind when choosing a system.
I also used to keep my business and personal to-do lists separate – having two journals for both, but it got tiresome after a few weeks, as so many times a personal ‘to-do’ needs to be done within business hours, and I would often miss deadlines for calling people, or I’d put things off as I was just too done in when I opened up my ‘personal list’ after a long day in the office. This system has everything in one place, and I can see all of my tasks quickly and easily.
So, how do you get started?
Quick System: Daily to-do lists.
This quick option is for a to-do list that is just for this week – if you’re looking for something that is useable over the year, skip to the Long-term System. You might find that this is something you want to do first – but as it requires a chunk of time, I’ve listed the quick option first for those that want to get going now.
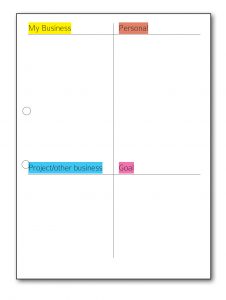
On your A4 piece of paper, divide it into 4 equal sections, (Now, I suggest 4, but it can be as little as two, but no more than 4, you’ll see why in a minute.) Put the date at the top, and number the page.
The top left label Business – or your business name, the top right, Personal, the bottom left, Project (or whatever big task you’re working on, or in my case, my other business, Compass-Publishing), and then bottom right Goal – mine is my personal one. I then underline, and highlight each Heading with its colour. Yellow for top left, Orange for personal, Blue for Compass, and Pink for goal. You can choose whatever works for you…but I use these same colours going forwards, so I can quickly identify what is what. You can see why having up to four headings is workable. Of course, your headings may be completely different to mine – but remember, keep it simple. Having loads of headings will complicate things, so try and condense them into four.
You should have something that looks like this. You then list your ‘to-dos’ in the relevant sections.
I go further and highlight anything that needs to be done that day – from any section. These are non-negotiable’s, and have to be completed before I shut up shop. I then simply cross anything off that I’ve done throughout my day. (I also add stuff too, which is fine, just remember, you don’t cross anything off, unless it’s done.)
Anything that doesn’t get done, I put an arrow beside it, –> and that reminds me that I need to carry that task over to the next day.
Any notes or expanded explanation can be written on the left-hand page, and I can use the page reference to any particular note knowing it’s always going to be there and easily found.
Sometimes my business to-do list overspills into my personal one, which is fine, I just make sure it’s clearly marked and highlighted in the relevant colour.
I then just simply repeat this system on a daily basis. I also find that writing my to-do list the day before really useful. It clears my mind, so I can enjoy my evening, and if I think of anything extra, I just quickly add it – knowing it’s written down, and safe which is a game changer for feeling organised and in control.
Using this long term…
Now, if you find yourself wanting to use this more extensively – then take a look at the Long-term system listed below. Integrate it into your daily system and you’ll have an evergreen scheme that can be started at any point in the year and can easily be adapted.
Long Term System: Master and Monthly to-do lists
This is something I learnt whilst reading about bullet journaling, and it’s a technique used to get all of your to-do’s out of your head and onto paper. The quick system works a treat for immediate tasks, but what about things that need to be done in the future, or long-term goals that are years in advance? Read on to find out how…
So, here goes. Get your A4 notebook and turn to a double spread. On the left you write a heading Master List – and you write everything you need to do. It can be extensive – and might fill the page. All good – get everything that is in your head onto your paper. Keep writing until everything is down. You then organise this list by assigning a month (or date) to each to-do task. This is then your master list (you can keep adding to it, and not worry it’s not ‘in date order’ as you assign simply add the date next to it) If it takes up two pages – don’t panic. It’s your book, so your rules. Just remember to number the pages at the bottom.
On the right-hand side of the paper, (Or left, if your master list has spanned two pages) you then divide into 4 – and put the next four months as each heading. You then can transpose any of the tasks from the Master List, over to the corresponding month page. If you can assign these to-do’s into specific dates – then go for it. (like birthdays, anniversaries, party’s dentist apt etc.) Don’t forget to number these pages. I would then leave the next two pages blank, as these can be the next 8 months of the year (two sets of 4 months). Or if you feel inclined, fill out these months too. The beauty of this system is that it can be started at any time of the year and as your pages are numbered, you can cross reference any page, to any page.
So, your page layout could look like this…

If you’ve noticed, I’ve divided my master list page into two, so that I can fit more on the page – but like any system, do what works for you. As you can see, I’ve transposed my to-do’s from my Master List, over to the first 4 months of my monthly overview pages.
Then when I come to my daily to-do’s, I quickly check these monthly overview pages first, write anything that is relevant to that day – and I’m good to go. Anything that doesn’t have a specific date – I don’t cross it off, until it’s been assigned one. So, for instance, in October I have ‘kitchen shelves’ with no date. That doesn’t get crossed off, until I actually put it on one of my October daily to-do lists… if it doesn’t get put in any of my October daily to do lists, then it gets an –> arrow and moved into November. If I find I keep putting the –> arrow, then does that ‘thing’ really need doing? Or do I just assign a date, and get it done!
Once the Master list has no space left, create another master list, and reference its new page number at the bottom of the original – then you’ll know where the next one starts. Only when all the ‘to-do’s’ from your master list are crossed off, do you then disregard that list.
So, to recap on what your yearly system includes;
- Master List – where everything gets listed
- Monthly overview – where you have a snapshot of your monthly ‘to-do’s’
- Daily to-do’s – your monthly and daily to-do’s combined
Having a to-do system that is quick to implement and easy to follow will determine its success. I’ve spent a long time trying out new ways – and using pen and paper seems old fashioned somehow, but as I’ve said before, a system is only effective if it’s used and what I’ve explained above is now my bible.
Let me know how the system works for you – or what changes you make to it. Happy to-do listing!
Wow, you’re organised! I love my lists but I have one long term one on the iPad and then shorter term in a notebook. I find the process of writing things onto the list means that I remember them better and then don’t actually have to refer back to the list – but it’s a comfort knowing it’s there.
Yes, just getting everything down really helps me… even if it’s far off into the future – it almost then sets it up as a must do, and makes it much more likely to happen. Notice my ‘climb Snowden’ example 😉
I love this system you have. I’m the same don’t like aps and love writing down my to do list. Going to give this way a go and see if it works for me.
thanks for the tip
Glad you found it useful Ally!